In this Article
- Too Many Infrared Options Create Confusion
- How Different Wavelengths Shape Infrared Results
- Why 720nm Hits the Practical Sweet Spot
- Real-World Uses of the 720nm Conversion
- Boundaries of Any Single Infrared Choice
Too Many Infrared Options Create Confusion
The infrared conversion decision often feels larger than the camera choice itself. I see photographers hesitate because each wavelength seems to promise a different artistic identity: 590nm for near-visible color play, 665nm for a more controlled false-color file, 720nm for the classic infrared balance, and 830nm to 850nm for a stricter monochrome direction.
The real decision works better in reverse. Start with the file you want to edit, not the label printed on the filter. If the goal is false-color flexibility, the conversion must leave enough channel difference to manipulate. If the goal is strong black-and-white contrast, the conversion should suppress more visible influence. If the goal is a near-visible experimental look, a lower cutoff makes more sense than a traditional infrared choice.
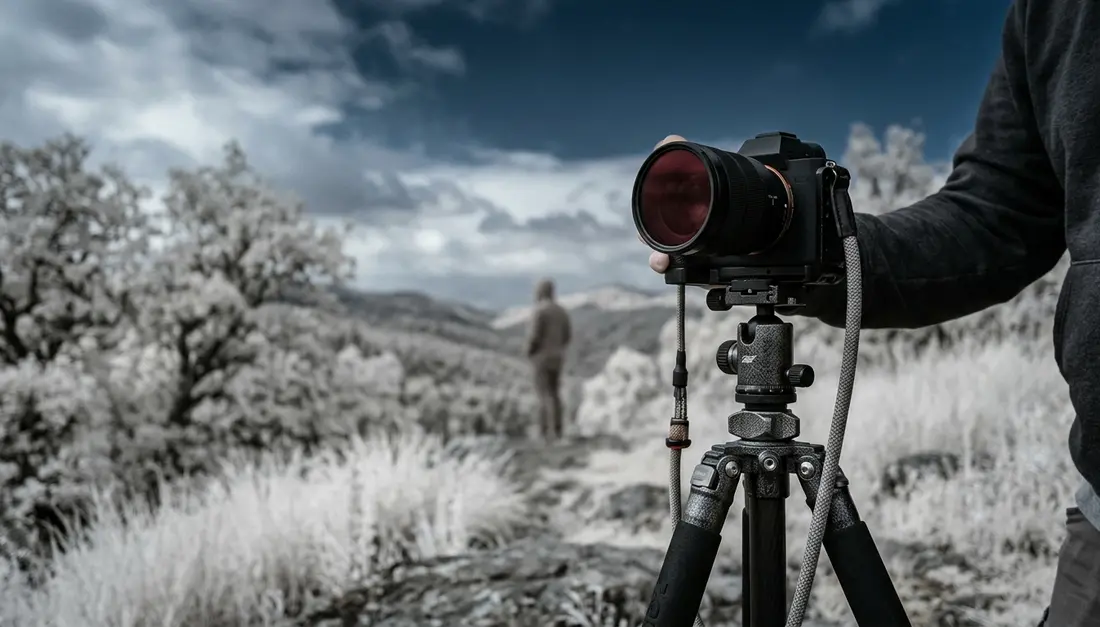
A dedicated conversion also raises the stakes. The infrared-pass filter sits at the sensor stack, so the wavelength choice is normally made before a workshop, trip, or long-term portfolio project. It is not adjusted shot by shot in the way a front-mounted creative filter might be.
The practical starting question
Ask one question before comparing sample galleries: Do I want the RAW file to contain color-editing options, or do I want it to push me toward monochrome from the start?
That question makes 720nm easier to understand. It does not chase maximum color, and it does not force the file into the most restrictive long-pass black-and-white behavior. It gives the photographer a stable middle position where infrared separation is visible, skies darken, foliage lifts, and post-processing still has room to decide the final mood.
Critical Insight: A 720nm conversion is best judged as an editing starting point, not as a finished look delivered straight from the camera.
How Different Wavelengths Shape Infrared Results
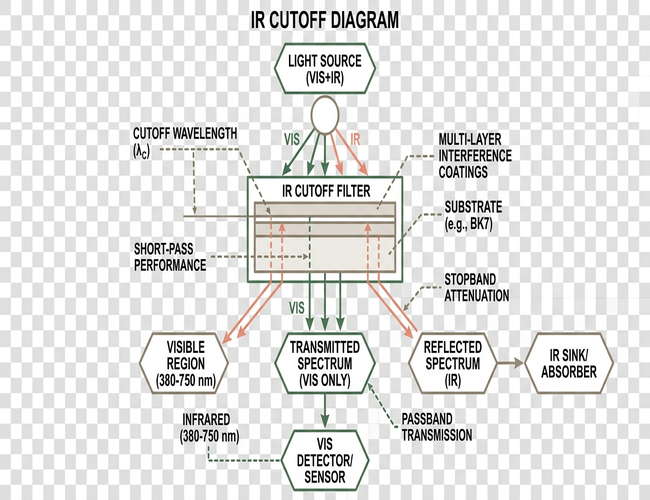
Wavelength should be read as cutoff behavior. A long-pass filter does not select one narrow color of infrared; it blocks shorter wavelengths and passes longer ones. That means a lower-numbered infrared conversion allows more deep red and near-visible information to reach the sensor, while a higher-numbered conversion removes more of that visible influence.
Visible light is commonly treated as spanning roughly 400nm to 700nm. A 720nm long-pass filter sits just beyond the red end of that range, which explains why it feels distinctly infrared without abandoning every trace of channel variation.
Lower cutoffs: more visible-red influence
A 590nm or 665nm conversion generally leaves more visible-red influence in the file than a 720nm conversion. The files can look more color-active before monochrome processing because the red channel carries more mixed visible and near-infrared behavior. That can be useful for surreal color palettes, especially when the photographer wants foliage, sky, and architecture to separate through channel manipulation rather than tonal contrast alone.
The trade-off is discipline. With more visible leakage, a scene may retain enough familiar color structure to fight the infrared effect. This is not wrong; it is simply a different kind of file.
Higher cutoffs: stricter monochrome intent
An 830nm or 850nm conversion passes a narrower near-infrared look and is usually chosen when the intended finish is black-and-white rather than false color. These conversions reduce color-editing decisions and place more weight on luminance, texture, sky density, and subject reflectance.
For photographers who already know they want monochrome infrared, that can be efficient. For photographers still exploring, it can feel prematurely narrow.
Why 720nm Hits the Practical Sweet Spot
The appeal of 720nm comes from two simultaneous needs. The filter must block enough visible light to produce dramatic infrared contrast, yet preserve enough near-infrared channel difference for creative processing. That balance is why 720nm remains a reliable first dedicated conversion for many serious infrared photographers.
It sits far enough beyond visible red to shift the rendering of foliage, skies, clouds, and some surfaces into a distinctly non-visible interpretation. At the same time, the RAW file often retains enough separable information to support red-blue channel swapping, restrained false color, or a clean monochrome conversion.
Exposure stays practical
With a converted camera in bright sun, 720nm shooting can often remain in ordinary hand-held exposure territory. A typical working range, based on community experience, might include f/8, ISO 100 to ISO 400, and shutter speeds around 1/125s to 1/500s, depending on lens transmission and light angle.
That matters in the field. A long exposure has its own beauty, especially at Blue hour or along moving water, but infrared composition often depends on fleeting cloud shape, shifting leaves, and the direction of hard sunlight. A converted 720nm body avoids the multi-second tripod exposures commonly associated with using a dense external infrared filter on an unconverted camera.
The workflow remains open
A typical 720nm workflow starts with RAW capture. Then comes a custom white balance made from sunlit foliage or a neutral infrared target. After that, the file can move toward optional red-blue channel swapping, monochrome conversion, targeted contrast control, or more refined finishing in tools such as Nik Color Efex Pro and Nik Silver Efex Pro.
This is where the conversion earns its place. It does not demand one final style.
Recommendation: Build a repeatable 720nm baseline before experimenting with heavier processing. Use RAW capture, a consistent custom white balance, and one lens aperture sequence so that editing choices do not hide capture problems.
Real-World Uses of the 720nm Conversion
In the field, 720nm works best when infrared reflectance becomes part of the composition rather than a novelty effect. Look for living foliage, textured clouds, open sky, stone, pale architecture, and water edges. These subjects give the wavelength something structural to separate.
Healthy foliage usually records very light at 720nm because leaves strongly reflect near-infrared energy. That creates the familiar luminous tree and grass tones, but the best files do not rely on brightness alone. They use that brightness against darker sky, shaded trunks, water, or built surfaces.
Foliage as tonal architecture
A row of trees beside a canal can become a strong infrared subject even when it looks ordinary in visible light. The leaves lift. The shaded trunks stay comparatively grounded. Water may darken, especially when its near-infrared reflectance is low, and the separation gives the scene a graphic structure before any heavy edit begins.
This is where 720nm feels disciplined. It gives foliage its signature glow without always dissolving texture into white. Exposure still matters; overexposed leaves lose edge detail quickly, and no filter choice can restore clipped highlights.
Skies with depth, not emptiness
Blue sky tends to darken in 720nm infrared while clouds stay comparatively bright. That separation gives sky detail more depth without requiring the photographer to erase cloud texture or force contrast later.

The effect is strongest when the light has direction and the sky contains structure. Midday sun often gives stronger infrared separation than flat overcast light. Low-angle light can add texture and shadow direction, though it may reduce the clean sky-darkening effect that many photographers associate with classic infrared work.
Water, shaded glass, dark fabric, and some painted surfaces can render unexpectedly dark because their infrared reflectance does not match their visible-light appearance. A scene that looks colorful in visible light may become flat in infrared if its surfaces have similar near-infrared reflectance.
Boundaries of Any Single Infrared Choice
720nm is versatile, not universal. No wavelength suits every subject or lighting condition, and no conversion removes the need for careful processing. Treating the filter as a creative foundation keeps expectations realistic.
The clearest limitation appears in flat light. A 720nm conversion can fail creatively in dense overcast conditions when foliage, sky, and background all collapse into similar midtones. The file may still be technically clean, but the spectral separation that makes infrared compelling has little contrast to work with.
Lens behavior changes the result
Two lenses on the same converted body can produce different infrared results because coatings, internal reflections, and aperture choice affect hot spots and contrast. Some lenses produce infrared hot spots near smaller apertures, so testing at f/5.6, f/8, and f/11 can reveal whether the center of the frame brightens or loses contrast.
This test should happen before a trip, not during the strongest light of the day. Photograph a plain sunlit surface, a foliage scene, and a sky with clouds. Then inspect the center of the frame, corner contrast, and whether the tonal pattern stays stable as the aperture changes.
Processing is part of the medium
Post-processing commonly includes RAW white-balance correction, red-blue channel swapping for false color, targeted contrast control, and selective darkening of skies or brightening of foliage. These are not rescue steps. They are part of translating near-infrared capture into a photograph the eye can read.
For monochrome finishing, Nik Silver Efex Pro can help shape local contrast and tonal weight. For restrained false color, Nik Color Efex Pro may support selective contrast or color separation after the channel work is already stable. The important sequence is capture first, correction second, styling last.
Risk Factor: 720nm is less suitable for photographers who want either visible-light color realism or pure long-pass black-and-white files with minimal color-editing decisions.
The reason 720nm remains ideal for infrared photography is not that it solves every subject. It remains valuable because it leaves room for judgment. It gives enough near-infrared behavior to transform foliage and sky, blocks enough visible light to create contrast, and still lets the photographer decide whether the final image should lean toward false color, luminous monochrome, or a quieter hybrid treatment.


Reader Comments
The conversation starts with you.
Your Comment