

Pre-Scouting as a Map of Light, Access, and Time
Digital pre-scouting constructs a location-specific field map before the equipment is packed. The workshop date comes first. Every road, ridge, sightline, walking estimate, and solar bearing must relate to that date and its scheduled shooting block.
A useful map carries four distinct layers:
- Ground: roads, legal parking, gates, fences, water crossings, and the complete route from vehicle to camera position.
- Vertical structure: ridges, drop-offs, tree height, buildings, and other forms that delay or interrupt direct light.
- Solar geometry: the sun’s azimuth and altitude at civil dawn, golden hour, and the planned start and finish.
- Group logistics: the first tripod line, an offset second row, and safe passage behind both.
A scenic bookmark does not meet this standard. A shootable pin identifies where the photographer stands, what enters the foreground, which direction the camera faces, and how many participants can work there without blocking the same clean sightline.
Workshop mornings compress decisions. The light window remains fixed while the group unloads, walks, spreads out, and sets tripods. Once the sun clears the wrong ridge, no amount of efficient camera handling can recover the intended sidelight.
What an Unknown Pull-Off Costs at Golden Hour
Consider two vans arriving at the same overlook. The first stops at a mapped gravel pull-off. Its group follows a measured route to the selected side of the valley, allows a dedicated setup block of somewhere around 10 minutes, and finishes framing before raking light reaches the canyon wall.
The second van slows beside several possible entrances. Participants unload near an uncertain gate, then discover that the obvious viewpoint faces a wall turned away from the morning sun. Tripods gather around the first open patch because nobody has marked a standing position or second row.
The difference was settled before either van door opened.
Build the Morning Backward
Record vehicle arrival, unload time, one-way walking time, setup time, and the beginning of the intended light window as separate entries. Arrival at the pin never means readiness to photograph. A 20-minute walk also cannot consume a 20-minute shooting block and leave a viable schedule.
Comparisons require the same date and clock time. Moving one candidate to a more flattering minute creates a misleading result because the workshop cannot occupy both places under different light.
Screen Beauty Trap
A glowing canyon wall may look persuasive in satellite imagery while facing the wrong compass direction on the workshop morning. Test its orientation against the dated solar bearing before retaining the pin.
Reading Elevation, Shadow, and Access in Google Earth
The terrain pass begins in Google Earth with the view tilted into 3D. Starting on the scenic feature encourages tunnel vision; following the road first exposes the practical approach.
- Trace the road to the last plausible legal parking location.
- Draw the walking route through its actual bends rather than connecting parking and subject with a straight line.
- Measure the route to the rim, shoreline, or clearing.
- Estimate a one-way walking range for a loaded photographer moving at the pace of the slowest expected participant.
- Inspect the final approach from overhead and low oblique angles.
The two viewing angles reveal different obstructions. An overhead pass helps locate tree lines, buildings, power lines, and water channels. A low oblique pass makes steep banks, intervening ridges, and abrupt drops easier to recognize.
Match the Imagery to the Workshop Season
Historical imagery can prevent a seasonal mismatch. Leaf-off trees may expose a clear winter sightline that disappears under summer foliage. Snow can conceal the edge of a path, while a different river stage may expose or remove a usable margin along the bank.
Inspect the season closest to the workshop date, then compare it with contrasting conditions. The goal is to identify what changes, not to select whichever image makes the location look easiest.
Every suspected obstruction belongs in the notes. A tree line can consume sunrise, and a narrow water crossing can divide a group carrying tripods and camera bags.
Turning the Workshop Date Into Sun Bearings in PhotoPills
When should PhotoPills enter the process? After candidate ground pins exist.
The app converts an exact location and calendar date into solar azimuth and altitude. Advance the planner through civil dawn, the golden-hour interval, and the scheduled shooting block. Copy the displayed bearing and altitude for the planned start and end, using the location’s correct time zone. Record degrees and clock times at the precision shown by the planner so the desk map and field display remain consistent.
Choose the Ridge That Shapes the Subject
Two ridges can appear equally accessible and produce very different photographs at the same minute. On one, the sun rises behind the photographer and spreads relatively flat front light across the scene. On the other, the solar path crosses a diagonal wall or shoreline, creating sidelight that describes texture and depth. The second ridge earns the stronger ranking.
This comparison also keeps empty sky from driving the composition. A wide lens needs foreground structure and a light relationship that carries through the frame, especially when the workshop emphasizes blue hour or long exposure technique.
Use planner view at the desk for selection. On-site augmented reality confirms the mapped bearing after arrival; it should not begin a fresh search for somewhere to stand.
Keep the Clock Honest
Write the schedule as arrival plus unload plus walking plus setup. Add moon-path fields only when the workshop block explicitly includes twilight or night photography.
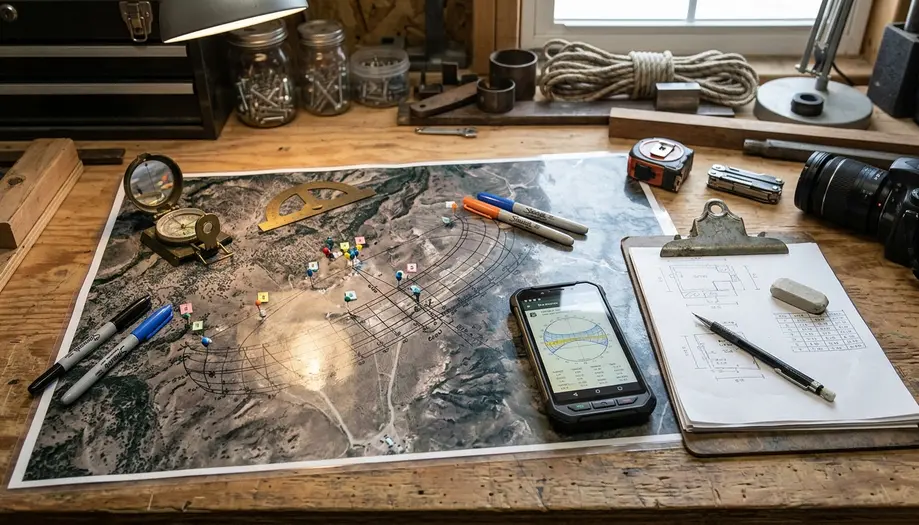
Merging Ground Pins and Solar Geometry on One Sheet
Separate collections of screenshots force the instructor to reconstruct decisions at the worst possible moment. A single working sheet preserves the relationship between terrain, timing, and group movement.
Number the ground positions with compact identifiers such as P1 for the primary and B1 for its backup. Each retained row should include the parking point, route line, standing position, solar azimuth, solar altitude, one-way walking time, foreground note, and contingency trigger.
Rank Every Pin Before Travel
- Primary: the strongest combination of light direction, foreground, manageable access, and group capacity.
- Secondary: the position used when wind, tide, gate status, or another named trigger removes the primary.
- Reject: an attractive place that lacks legal access, a defensible standing position, suitable light, or safe group movement.
A phone-only pile of saved places breaks down when signal disappears or several people need the same instruction. Export an offline PDF and carry a letter- or A4-sized printed copy for the hotel briefing and van. The shared sheet lets the group move as one unit without passing a phone from person to person.
Two-Tool Map Check
- The workshop date, local time zone, and scheduled shoot block are fixed.
- Legal parking and the complete walking route are marked.
- One-way walking time reflects a loaded group pace.
- Ridges, tree lines, buildings, power lines, and water crossings have been inspected.
- Each primary pin has a named backup and contingency trigger.
Defending an East-Rim Tripod Position at Dawn
An east-rim worksheet provides a concrete test. The route begins at a legal gravel pull-off and ends on a rock shelf overlooking a diagonal wall. The selected compass direction allows dawn light to travel along the wall instead of arriving directly over the photographers’ shoulders.
The expected shadow line is marked across the scene. A foreground slab remains useful at the widest focal length participants are expected to carry, so photographers can build depth without filling the upper frame with empty sky.
Draw the Group, Not Just the View
Mark the vehicle position, route endpoint, first tripod row, offset row, clean sightline, and exit direction as separate symbols. Leave enough passage behind the tripods for an instructor carrying a camera bag to move without crossing anyone’s framed foreground. This detail prevents the workshop line from occupying the only viable composition.
The pin should support two prepared treatments. In clear sky, the position organizes the frame around sidelight. Overcast shifts emphasis toward texture and tonal separation, which may later suit a monochrome workflow in Nik Silver Efex Pro or selective contrast work in Nik Color Efex Pro.
Set an exit cue in advance. Direct light leaving the diagonal wall or the shadow edge crossing the foreground anchor gives the group an observable reason to move. The pin then becomes a standing position that can be explained and defended, rather than a colored marker surrounded by uncertainty.
Where Satellite Imagery and Ephemeris Still Mislead
Ephemeris describes astronomy, not cloud cover. A precise dawn azimuth establishes where the sun would appear, yet it cannot promise a clear horizon or useful atmospheric conditions.
Remote imagery also ages. Vegetation grows, fences appear, roads suffer damage, seasonal flooding alters crossings, and private-property notices may post after the latest satellite pass. Current gate status, operating hours, permit conditions, tide information where relevant, and the forecast need refreshes within 24–48 hours of departure.
The Ephemeris-to-Gate Boundary
A correct solar bearing remains unusable when the route, property status, canopy, or locked access has not been verified. Attach current access information to the relevant pin rather than storing it in a separate browser tab or message thread.
Elevation models deserve particular caution around cliffs and dense canopy. They may smooth abrupt terrain until a scramble looks like a walkable slope. Flag any route crossing a cliff band, water channel, indistinct boundary, or heavy canopy for field verification. Remote tools can describe visible terrain and solar geometry; they cannot establish the safety of a loaded group on the ground.
Leave Scrambles Unranked
Do not label a questionable slope as walkable from the screen. Keep it unresolved until a current, authoritative access check or ground inspection establishes the route.
Finish the Two-Tool Map Before Packing
The planning session ends when the Google Earth pins and PhotoPills geometry become one travel-ready sheet. Freeze that document before travel day, then limit the final 24–48 hours to access and weather refreshes.
Keep one printed sheet with the instructor and one offline copy on a charged phone or tablet. At the pull-off, the phone confirms direction and standing position against the desk map. It does not restart the scout.
The Van Copy Needs Four Fields
- Primary pin
- Backup pin
- One-way walking time
- Planned light window
Complete that four-field, two-tool map before travel day and refuse to leave the workshop morning dependent on on-site AR.











Reader Comments
The conversation starts with you.
Your Comment